Electrical gremlins can turn a simple commute into a frustrating mystery. One minute your headlights are shining bright, the next a crucial sensor goes kaput, leaving you stranded and scratching your head. While modern vehicles often communicate issues via dashboard warnings, truly pinpointing and fixing an electrical problem almost always requires Accessing Vehicle-Specific Wire Diagrams. These intricate maps of your car's nervous system are indispensable tools for anyone serious about understanding, diagnosing, and repairing their vehicle's electrical components. Forget guesswork; with the right diagram, you're equipped with the precise information needed to trace power, check grounds, and identify faulty wires or components.
At a Glance: Your Roadmap to Wire Diagrams
- Wire diagrams are essential: They are the blueprints for your car's electrical system, showing how every component connects.
- Many sources exist: From dealership manuals to online subscriptions and free forums, you have options for finding diagrams.
- VIN is key: Your Vehicle Identification Number is crucial for getting the exact diagram for your specific car.
- Not all diagrams are equal: Quality, accuracy, and detail can vary significantly between sources.
- Safety first: Always disconnect the battery before working on electrical systems.
- Learn the basics: A little knowledge of symbols and conventions makes diagrams much easier to read.
- Diagrams save time & money: They help you diagnose precisely, avoiding unnecessary part replacements or mechanic visits.
Why Vehicle Wire Diagrams Are Your Best Friend
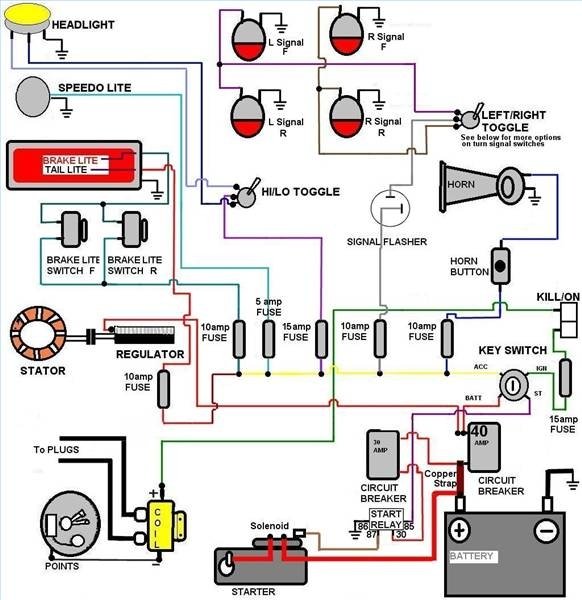
Think of your car as a complex city, with power flowing through a vast network of roads. When a streetlight goes out, you don't just randomly dig up roads hoping to find the broken wire. You consult a city map, pinpoint the affected area, and follow the power lines. Vehicle wire diagrams serve this exact purpose for your car. They visually represent every circuit, wire, fuse, relay, switch, sensor, and actuator, showing you their exact connections, color codes, and often, their locations.
Without these diagrams, even seasoned mechanics would struggle to diagnose complex electrical issues. A simple power window problem could be a faulty switch, a broken wire in the door jamb, a blown fuse, a bad motor, or a module issue. A wire diagram helps you systematically eliminate possibilities, leading you directly to the root cause. It's not just about repair, either; if you're installing aftermarket accessories like a new stereo or trailer hitch wiring, the diagrams ensure you tap into the correct circuits without causing damage.
Decoding the Electrical Language: A Quick Primer
Before diving into where to find diagrams, it helps to know what you're looking at. While we won't cover every symbol here (for a deeper dive, check out our guide on Understanding Wire Diagrams), a few basics will make any diagram less intimidating:
- Lines are Wires: These represent the actual electrical wires.
- Squares/Rectangles are Components: Motors, sensors, switches, lights, etc. They often have internal symbols.
- Numbers & Letters: Typically refer to component identifiers, connector pin numbers, or circuit numbers.
- Color Codes: Wires are usually labeled with two letters (e.g., "BR" for brown, "LB" for light blue) indicating their insulation color. This is critical for matching the diagram to the physical wires in your car.
- Arrows: Often indicate current flow or a connection point.
- Ground Symbols: Look like a stack of decreasing horizontal lines, indicating a connection to the vehicle's chassis (ground).
- Splices: Points where multiple wires connect.
- Connectors: Often represented by a rectangle with numbers, indicating how wires connect to multi-pin plugs.
Understanding these fundamentals transforms a jumble of lines and symbols into a logical flow of electricity. It empowers you to trace a circuit from its power source, through switches and components, to its ground connection, identifying where the power stops or deviates.
Your Go-To Sources for Vehicle-Specific Wire Diagrams
Finding the right diagram for your specific vehicle is paramount. A diagram for a 2010 Honda Civic won't help you with a 2010 Ford F-150, and even within the same model year, trim levels and optional features can lead to significant variations. Here's where to look, from the most accurate but often priciest to more budget-friendly (but potentially less comprehensive) options:
1. Manufacturer Service Manuals (Dealerships & Online Portals)
The Gold Standard. These are the official, factory-issued manuals used by dealership technicians. They contain the most accurate, detailed, and comprehensive information available for your specific vehicle, including all wiring diagrams, component locations, diagnostic procedures, and trouble codes.
- Pros: Unquestionably accurate, highly detailed, often include component locations and connector pinouts, cover every trim and option.
- Cons: Can be expensive. Dealerships usually won't provide them free; some manufacturers offer subscription-based online portals (e.g., Honda's ServiceExpress, GM's ACDelcoTDS) that can be costly for a DIYer. Physical manuals are rare for newer cars and can be hundreds of dollars used.
- Best For: Complex, intermittent, or safety-critical issues where absolute accuracy is non-negotiable. Professionals rely on these daily.
2. Professional Third-Party Database Subscriptions (Alldata, Mitchell 1)
These online databases are the workhorses for independent repair shops. Companies like Alldata and Mitchell 1 compile vast libraries of repair information, including factory wiring diagrams, from virtually every make and model.
- Pros: Nearly as comprehensive and accurate as factory manuals (they often license the data directly), regularly updated, easy to search, often include repair procedures, labor times, and TSBs (Technical Service Bulletins).
- Cons: Subscription costs can be steep for individuals (hundreds of dollars per year), though some offer shorter-term access (e.g., 1-day, 1-week) for a reduced fee.
- Best For: Serious DIYers or aspiring professional technicians who work on a variety of vehicles. If you need in-depth data for multiple projects, this is a solid investment.
3. Aftermarket Repair Manuals (Haynes, Chilton)
You've probably seen these familiar manuals at auto parts stores. Haynes and Chilton manuals cover many popular makes and models and often include simplified wiring diagrams.
- Pros: Affordable, widely available, good for general repairs and common issues, often include basic diagrams and component location illustrations.
- Cons: Diagrams are often generic and simplified, potentially missing specific circuits or variations due to trim levels, options, or mid-year production changes. They might not cover every system or be as detailed as factory diagrams.
- Best For: Basic repairs, troubleshooting common issues, or when you need a general understanding of a circuit. A great starting point for many DIYers, but be aware of their limitations.
4. Online Automotive Parts Retailers & Forums
Many online auto parts stores, like AutoZone ([Sumber: https://www.autozone.com/diy/repair-guides/wiring-diagrams]), O'Reilly Auto Parts, and Advanced Auto Parts, offer free access to basic repair guides and some wiring diagrams once you register an account or input your vehicle's information. These are often simplified, similar to what you'd find in a Chilton manual, but can be a lifesaver for simple fixes.
Furthermore, enthusiast forums dedicated to your specific make and model can be a treasure trove of information. Owners often share scanned factory diagrams, custom modifications, and troubleshooting tips.
- Pros: Often free, community support can be invaluable, good for common issues or known quirks of a specific vehicle. Some sites (like techschems.com, which can be found via a search) focus on offering free diagrams for various models.
- Cons: Information quality can vary wildly; diagrams might be low-resolution, incomplete, or even incorrect. It takes time to sift through forums. Relying solely on user-contributed diagrams carries a risk.
- Best For: Simple, non-critical repairs, getting a quick overview, or seeking solutions for specific, well-documented issues unique to your vehicle model. Always cross-reference with another source if possible.
5. Public Libraries
Don't overlook your local library! Many public libraries offer free access to online automotive repair databases like Alldata or Chilton Library. You might be able to access these resources from home with your library card or use a computer at the library itself.
- Pros: Free access to high-quality, professional-grade information.
- Cons: May require a physical visit to the library if remote access isn't available, specific database availability varies by library.
- Best For: Budget-conscious DIYers who need professional-level information but don't want to pay for a subscription.
The Power of the VIN: Getting the Exact Diagram
Your Vehicle Identification Number (VIN) is a 17-character code unique to your car, found on your dashboard (driver's side, visible through the windshield) and on a sticker inside the driver's side door jamb. When searching for wiring diagrams, especially through professional databases or manufacturer portals, providing your VIN is critical.
Why the VIN matters:
- Trim Levels: A base model car might have different wiring than a fully loaded version with premium sound, navigation, or advanced driver-assist systems.
- Optional Features: Aftermarket options often integrate into the vehicle's existing wiring, but factory options are often part of the original design.
- Production Changes: Manufacturers often make minor wiring changes during a production year that aren't reflected in general manuals but are captured when referencing the VIN.
- Regional Variations: Cars sold in different markets (e.g., California emissions vs. federal, or export models) can have distinct wiring for certain systems.
Using your VIN ensures you receive diagrams that precisely match your vehicle's build, eliminating guesswork and preventing frustrating misdiagnoses.
Navigating Online Platforms & Databases
Once you've chosen a source, effectively searching for and using the diagrams is the next step.
- Select Your Vehicle: Most platforms will first ask for your Year, Make, and Model.
- Enter VIN (If Available): Always provide your VIN if the option is there. This refines the results significantly.
- Find the Electrical Section: Look for sections labeled "Wiring Diagrams," "Electrical," "Schematics," or "Circuit Diagrams."
- Narrow Your Search:
- By System: Are you working on the engine, transmission, ABS, airbag, HVAC, lighting, or power windows? Most diagrams are organized by system.
- By Component: If you know the specific component (e.g., oxygen sensor, fuel pump), you can often search for diagrams related to that part.
- By Circuit Number: Advanced users might have a specific circuit number from a diagnostic trouble code (DTC) or another repair procedure.
- Review and Print/Save: Once you find the relevant diagram, review it carefully. Consider printing it out or saving it digitally for easy reference while you're working on the car. Working with a grease-stained laptop isn't ideal, and having a physical copy can be more convenient in a garage setting.
Common Pitfalls and How to Avoid Them
Even with the right diagram, troubleshooting can present challenges. Being aware of common mistakes helps you navigate them.
- Using Outdated Diagrams: Cars undergo constant revisions. A diagram from an earlier production year (even of the same model) might not match your specific vehicle. Always confirm the production date and VIN if possible.
- Generic vs. Specific Diagrams: As mentioned, aftermarket manuals can simplify diagrams. If you encounter discrepancies between a diagram and your actual vehicle wiring, suspect a generic diagram.
- Incorrect Interpretation: Misreading symbols, ignoring color codes, or misunderstanding current flow can lead you down the wrong path. Take your time and double-check your interpretation.
- Ignoring Related Systems: Electrical systems are interconnected. A problem in one system (e.g., a bad sensor) might affect another (e.g., engine performance). Don't just focus on the immediate symptom; understand the broader circuit.
- Neglecting Safety Precautions: Always disconnect the negative battery terminal before working on electrical components to prevent short circuits, damage to delicate electronics, or personal injury. Wear appropriate eye protection. Test for power before assuming a circuit is dead.
- Chasing Red Herrings: Sometimes, what looks like an electrical problem is actually mechanical. For example, a "no start" might seem electrical, but a clogged fuel filter could be the real culprit. Use all diagnostic tools at your disposal.
Step-by-Step: Using a Diagram to Diagnose a Headlight Issue
Let's walk through a simplified example: Your driver's side low beam headlight isn't working, but the high beam is fine, and the passenger side works perfectly.
- Identify the Symptom: Driver's side low beam is out.
- Grab Your Diagram: Access the wiring diagram for your vehicle's exterior lighting system.
- Locate the Circuit: Find the "Low Beam Headlight (Driver's Side)" circuit on the diagram. You'll likely see the headlight bulb symbol, connected wires, a fuse, a switch, and a ground point.
- Understand the Flow: Trace the power from the battery, through the fuse box (identifying the specific fuse for that low beam), through the headlight switch/relay, to the bulb, and finally to ground.
- Initial Checks (Without the Diagram, but confirmed by it):
- Visually Inspect Bulb: Is the filament broken? (This is the simplest fix.) Swap it with a known good bulb from the passenger side if accessible. If the new bulb works, problem solved.
- Check Fuse: Locate the specific fuse for the driver's side low beam (the diagram will tell you which one). Use a fuse tester or visually inspect it. If blown, replace it. If it blows again immediately, you have a short circuit.
- Deeper Dive (With the Diagram): If the bulb and fuse are good, it's time to test continuity and voltage.
- Check for Power at the Bulb Connector: With the headlight switch on, use a multimeter to test for voltage at the low beam terminal of the headlight bulb connector. The diagram will show which wire is the power feed. If there's no power, the problem is upstream.
- Trace Back to the Switch/Relay: If no power at the bulb, follow the power wire backwards on the diagram. Test for power at the output side of the headlight relay or switch. If you have power there but not at the bulb, the wiring between the switch/relay and the bulb is suspect (e.g., a broken wire).
- Check Ground: The diagram will also show the ground wire for the headlight. Ensure continuity between the ground wire terminal at the bulb connector and a known good chassis ground point. A poor ground can prevent the bulb from illuminating even with power.
- Isolate the Fault: By systematically testing points along the circuit as laid out in the diagram, you'll pinpoint where the power stops or where continuity is lost. This could lead you to a corroded connector, a broken wire, or a faulty switch or relay.
This methodical approach, guided by the wire diagram, saves immense time and prevents you from randomly replacing parts.
Beyond the Basics: When to Call a Pro
While accessing vehicle-specific wire diagrams empowers significant DIY capabilities, there are times when calling a professional mechanic is the wisest course of action.
- Intermittent Problems: Electrical issues that come and go can be incredibly frustrating and difficult to diagnose, even with diagrams. They often point to loose connections, hairline cracks, or temperature-sensitive failures that require specialized diagnostic tools and experience.
- Complex Systems: Modern vehicles are integrated networks. Issues with the CAN bus (Controller Area Network), airbags, ABS, or engine control unit (ECU) often require advanced scan tools, oscilloscopes, and specific factory training to interpret.
- Safety Systems: Never compromise on safety. If you're unsure about repairing brakes, steering, airbags, or other critical safety systems, err on the side of caution and consult a certified technician.
- Lack of Proper Tools: While a multimeter is a must-have, some diagnostics require specialized break-out boxes, scope meters, or factory scan tools that are expensive and require training to use effectively.
- Time and Frustration: Your time has value. If you're spending endless hours chasing a problem and getting nowhere, a professional might diagnose it in a fraction of the time, ultimately saving you money and stress.
- Aftermarket Modifications Gone Wrong: If a problem arose after an aftermarket installation, untangling the new wiring from the factory setup can be a nightmare without expert help.
A good mechanic not only has access to all the professional diagrams and databases but also the experience to interpret them, combine that information with diagnostic trouble codes, and efficiently pinpoint the issue.
Putting It All Together: Your Next Steps
You now understand the critical importance of accessing vehicle-specific wire diagrams and where to find them. The next time an electrical issue crops up, you're not helpless.
- Identify Your Vehicle's Specifics: Note down your exact year, make, model, trim level, and most importantly, your VIN.
- Choose Your Source: Decide whether a free online source, an aftermarket manual, or a paid subscription service is appropriate for the complexity of your issue and your budget. Remember the limitations of each.
- Gather Your Tools: At a minimum, you'll need a reliable multimeter capable of measuring voltage, resistance (ohms), and continuity. A test light can also be useful for quick checks.
- Study the Diagram: Before you even touch the car, spend time with the relevant diagram. Understand the circuit flow, identify components, note wire colors, and locate fuses and relays.
- Proceed Methodically and Safely: Always disconnect the battery before making any changes. Use your diagram to guide your testing, working systematically from the power source through the circuit to the ground.
By leveraging vehicle-specific wire diagrams, you transform from a bewildered car owner into a confident troubleshooter, capable of understanding and resolving many of your vehicle's electrical mysteries. It's one of the most empowering skills a DIY mechanic can possess.